
What could be better than Christmas? An eco-friendly Christmas! Trust me it will also be a cheaper Christmas and will suit everyone’s budget. So do not make your Christmas tradition getting into debt. Start making memories using these eco-friendly Christmas hacks.
Table of Contents
What do we mean by eco-friendly Christmas Decorations?
In basic terms ‘not harmful to the environment’. I doubt anyone enjoying Christmas would intentionally go for a yuletide which was deliberately harmful to the environment. From my own research I have found that it is not just single-use plastic, or throwaway gifts, or over spending. I believe in Fairtrade products and the impact on the people making our disposable decorations can be massive.
You just have to look at articles like this from the Guardian Newspaper to see the true cost. If we want we can all debate these type of articles, but instead let’s look at the positives of homemade Christmas crafts!
Let’s admit we can’t go completely zero waste, but let’s aim for ‘green’
Green Christmas decorations are ideal as we can’t always avoid using glue or buying smaller items to add to our upcycled masterpieces. The first one I am going to show you is so simple that you can set this up on the kitchen table and allow the kids to get stuck in.
Easy Peasy Paper Chain!
Using a paper chain for a country wedding or for your minimal waste Christmas.
Paper chains are child’s play!
You will need a pair of Safety Scissors and a few scraps of paper from old books, atlases, road maps or music sheets. The video below shows the how to guide for those who enjoy reading I have included the step by step below. a Glue Stick
First use up the strips you have left from the star decoration you will all have tried!!

Then pop the strip through the last loop

Simply blob a bit of glue to one end and then hold between your thumb and finger for a few seconds to dry.

Then it may look a bit like this…

Christmas Stars from Old Paper
Paper is a reusable resource and for this easy DIY project I have chosen an old book, but why not look at road maps or sheet music instead?
As it is so easy you will need just a pair of Safety Scissorsa Glue Stick ,
and 6 pages from an old book, atlas or sheet music.
I have included the ‘how to’ video below, for those of you who like to watch and pause it may be a helpful resource.

A step by step guide
Firstly fold the page to make a square, keep teh bottom section as we have another project we can use that in.

Then turn it around as if it was a triangle and cut from the folded edge towards the centre, but not as far as the centre.

Repeat this at regular intervals, you decide how chunky you want each section to be and this will vary with different paper you use.

Now you are going to open it back out to a square. Then use the glue stick and a little bit of careful folding and holding with the centre double triangle. You are looking to form the perfect cylinder shape. Hold it for a few seconds for the glue to dry.

Next turn the paper over and fold the next two sections back. Use a little bit of glue and again hold them until they dry.

You will repeat this until you have all of the ‘tabs’ folded and stuck together.

Once you have ma de 6 of these you can attach them to one another with the biggest side of one to the smallest side of the other.
Now I think these rock as either a wall hanging or tree decoration. They are rustic but classy so would work well at Christmas or a country wedding.
Another cute eco-friendly paper decoration option….
However good you are at zero waste inside your home, wrapping paper seems to be a renewable resource. Whether it is wrapped around a gift from a co-worker or distant family member, you can never seem to avoid it entering your world. So why not reuse it and help stop landfill? The glitter and foil make it nearly impossible to recycle and it would just add a bit of bling to your rustic Christmas. You can use wrapping paper for this or old books, music sheets or road maps. It all depends how rustic you want to go with it and we have lots of other ideas to inspire you for decorations!
You will need:
old cardboard cut to 6cm diameter circles, cereal boxes are ideal.
7-8 strips of old wrapping paper cut to 2.5cm in width.
Safety Scissors
Glue Stick
old wrapping paper, old book pages, old maps or music sheets.
pencil
twine or yarn
I know that some of us like to watch a how to video tutorial, so have a look at our YouTube channel beow, or follow the instructions.
STEP ONE;
Use the pencil to make a hole in the centre of the cardboard circle, then take the twine and push it through the hole. Making a knot to form the centre of the star or flower.

STEP TWO
Line the twine up on the back and secure in place with a bit of spare wrapping paper and glue.

STEP THREE
You take the strips and then fold them back on themselves to form a loop, apply the glue to the overlap and hold in place for a few seconds.

STEP FOUR
Cut the cones to a sharp tip and then arrange on the circle and glue into place.

These are really easy and can be made with children of all ages. They also store well so they could become part of your families boxing day tradition.

Now let’s get a bit more of a classic rustic look for our Eco-Friendly Christmas..
Rustic Pom Poms
Rustic Pom poms are a lot easier than you might think to make and a nice way of getting the kids involved with homemade decorations. This DIY project needs no real skill and is quick and easy!
You Will Need;
Cardboard, cut into rings
one pillowcase cut into strips
some twine for holding it all together
Dressmaking Scissors

Take two rings and set them together, then wrap the strips of material around the rings as per the video below.
This will create something looking like this…

Then very carefully you can slide your material scissors into the top and find a way to start cutting the top of teh donut, whilst holding the centre firm to ensure no material is lost. This is a good bit for adult intervention and let the kids be distracted by something less dangerous.
You will then produce this


Now Let’s try a little something to fill your house with the smell of Christmas!
Having an eco-friendly mentality does not mean you cannot have luxury in your home. I hope you will see this as cost effective but also very green as they are compostable as well.
How to dry Citrus Fruit in the oven

When you dry citrus fruit in the oven at home you go low and slow to fill the house with a gorgeous festive smell. Because this time of year is all about creating memories. This falls into the category of things your kids will love about Christmas. It is more sustainable than plastic decorations which are designed to be used this year and thrown away. You can add these to your compost bin once you have finished with them. That way your garden will benefit as well as your family!
You will Need;
Oranges, Lemons and Limes
Oven set to the lowest temperature it will go 70 degrees or gas mark 1
Childrens Safety Kitchen Knife
Large Non-Stick Baking Tray
Bamboo Wood Chopping Board
The key here is to slice the fruit as thinly and evenly as possible.
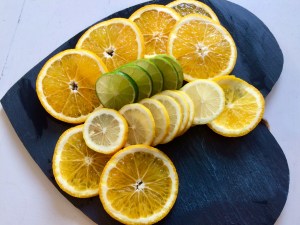
Lay the slices out on the baking tray and then pop in the oven for two hours, turn them over and then for a further two hours. This should be sufficient time to allow them to dry out fully.
You can be as creative as possible. Try Grapefruit slices, lime slices and lemon slices to really make your home smell festive. Why not try to combine this rustic look with other crafts? There will be lots you can do with dehydrated lemons, limes and oranges. So there is nothing to stop you from having fun experimenting.
How can you make this more eco-friendly?
In the not too distant future we will be moving to our forever home. I will then show you how to grow your own, limes and lemons. This way we will reduce the air miles!
You can then make Eco-Friendly Christmas Garlands or you could make Tree Decorations. Both of which will last the season and make your home smell like a festive haven. Once you have decided to take the decorations down, simply pop these in your compost bins.
What could be more eco-friendly? If you use the child-safe knives this will become a fast family favourite!
Is this the ultimate Eco-Friendly decoration?
I like to decorate my garden as well as indoors and Winter is a good time to feed the wildlife. It is just a little thank you to them for all of their lovely birdsong all summer.
This easy festive birdfeeder is a great idea for kids to make. A simple DIY craft and an idea for rainy weekend projects.
you will need;
MONKEY NUTS - NUTS IN SHELLS Pliers
wire

You can make this as easy as possible for family members, by using a sharp pencil and gently pushing a hole in the middle of the monkey nut. Then you thread the wire through the nut. Using the pliers you can shape this to a nice circle.

I hope you agree that this will also make a lovely gift for the wildlife lovers in your life. It will add much needed food for the birds in your garden!
If you need any more inspiration for how to love wildlife this year have a look at this teapot birdhouse
Christmas Doesn’t Have to Cost the Earth
It is tempting when we walk down the high streets and see those ‘cheap’ options. Tinsel and glitter covered plastic sparkle at us all. When we normally think of Eco-Friendly, we think of costly. I hope that you now have a starting point for some affordable, stress free and fun eco-friendly decorations. I will add more as I make them and I want you all to share your own versions. The important thing here is you can’t get much more unique than homemade. So if you make perfect or slightly squiffy decorations they are yours and your families.
Get stuck in this year and start making memories and not debt!
Also please share your successes with us all in this eco-friendly community.
Merry Christmas.