
We own a set of old ‘brown’ furniture. Robust and good quality but really ugly and tired. So we repainted the wood and now it is time to reupholster the seats as well. So one big trip to Birmingham’s Rag Market later and we had the perfect material. You can chose a tough fabric that will last as a seat cover. Don’t even look in the direction of the cotton thin stuff as you will love a pattern but you wont be able to reupholster a thing with it!
Table of Contents
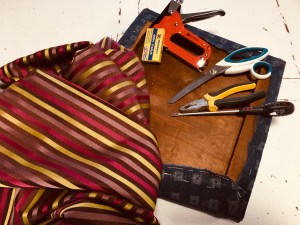
Equipment required to reupholster a dining chair
Heavy Duty Staple Gun
pair of pliers
flat head screw driver
material of choice
the old seat which needs reupholstering!
The material cost us £8 for 2 metres by 3 metres. We did not need all of it. So I would say you might be able to save money quite easily. The paint we used for the earlier colour brush up was around £12 per colour, with lots left over. So all in all 6 chairs has cost us £32. Or just over five pounds each chair. Not bad and I think we would struggle to find ones to buy at that cost.
YouTube Tutorial for Reupholstering a chair
How to remove the old fabric
I have used the flat headed screwdriver to lever underneath the old staples. Taking care to work away form yourself. This will reduce the risk of slipping and hurting yourself.  I would say there are few things more painful than a screwdriver to the hand. So keep fingers out of the way of the screwdriver. One end will naturally come up first so then use the pliers to pull them out. I do not consider myself blessed with lots of strength so I hold it nose pointing downwards and then pull straight upwards.
  You will then be able to remove the old material.
New material to reupholster your chairs
The new material that you chose should be robustly constructed and allow years worth of family butts sitting on them. We used material which we would also love to have curtains in. Thick but pliable. Nice pattern but one which can take a stain or two. We are not complete monsters but we do want these chairs to be used every day as well!
cutting the new material
Ensure that nobody touches your dressmaker scissors because as soon as they are used for anything other than fabric they will blunt. Trust me they wills till work as a weapon of revenge on whoever used them, but they wont give you a clean cut with fabric.
Accuracy is not required here. I laid out the minging old fabric on top of the lovely new stuff, back side up. (sounds weird I know, but there is a definite right side up, you want the dull side to face up to allow the good side to remain on the outside.) Cut around the old fabric, leaving enough spare in case your new material is less stretchy than the last.
Stapling the seat together
We have chosen to use staples rather than tacks, but either would work. So line up the material with the seat, pad side down. We were lucky as our foam was good to go and sort of like new as these seats had been in a garage for a few decades. If you need to cut new foam you can buy Upholstery foam cut to any size . It does add considerably to the overall cost though. So it is really relieving when you don’t need to buy new!
If you have bold stripes or pattern ensure that you have all of the seats cut with the same display. So for us all 6 seats had the stripes running from front to back. If you plan to reupholster with some of the bolder prints, make sure your owls are all facing the same way! We achieved that by cutting all at the start.
You need a little bit of strength
Top tip when you pull the material tight, don’t go over taut. Once you have it in place you will need to get the staples flush to the wood. So leaning on the top ,whilst squeezing will make a huge difference and allow for less drag. I stapled each corner and the middle of one edge then did the same to the opposite edge. Meaning that I would be able to do this one handed whilst pushing down with the other hand. You want it tight but not too tight that it puckers the pattern. Basically nobody wants a crinkly seat, but it can be too tight and look squiffy.
Reupholster the corners – the fiddly bit
I hate this bit, but it is for you to decide what sort of corner you would like. Think about hospital beds. Our seats sit inside the wooden frame so there is less need to be over the top with worry. So whichever tye of corner you go for, ensure that you staple at each stage to give it real strength.  Although I love the fabric, it somehow makes the chairs look a lot fatter. Not sure how but stripes really are unforgiving. I think the colour is picked up from the acid green as well! Some people may find this colour a bit ‘in your face’. I would agree but we have a very light coloured dining room so I think it works. You can mix and match to your hearts content and that is what is really nice about this project.
 I realise now that we have made nearly everything in the photo above. Talk about stars of Instagram! Everything from the Railway Sleeper Mantelpiece to the Rag Rug is our own creation! Even the upcycled scaffolding board shelves.
So if you have a set of old chairs that need looking at. Give it a go. I couldn’t have imagined how easy it would be if we hadn’t just got stuck in. For the cost of ingredients you can’t go wrong.
Please do share with us all if you have tried these on our Facebook page –Zero Waste no or low spend ideas and become a member of our group!
