Needle felting with cutters is the ideal beginners project. You can create any shape without the need to be highly skilled whilst protecting your fingers from getting a little stabbed with the needle.
Needle Felting Supplies
you will need roving wool in any colour of your choice. Then you will need a set of needles, normal needles won’t do! If you want to learn more about the best wool for needle felting have a little look at our other articles.
Then take a look at some of the cookie cutters you already own, or try some here. We go for metal ones but just be aware that the end of your needle will be brittle and susceptible to damage if you hit the metal.
YouTube Tutorial
Using the Cookie Cutters
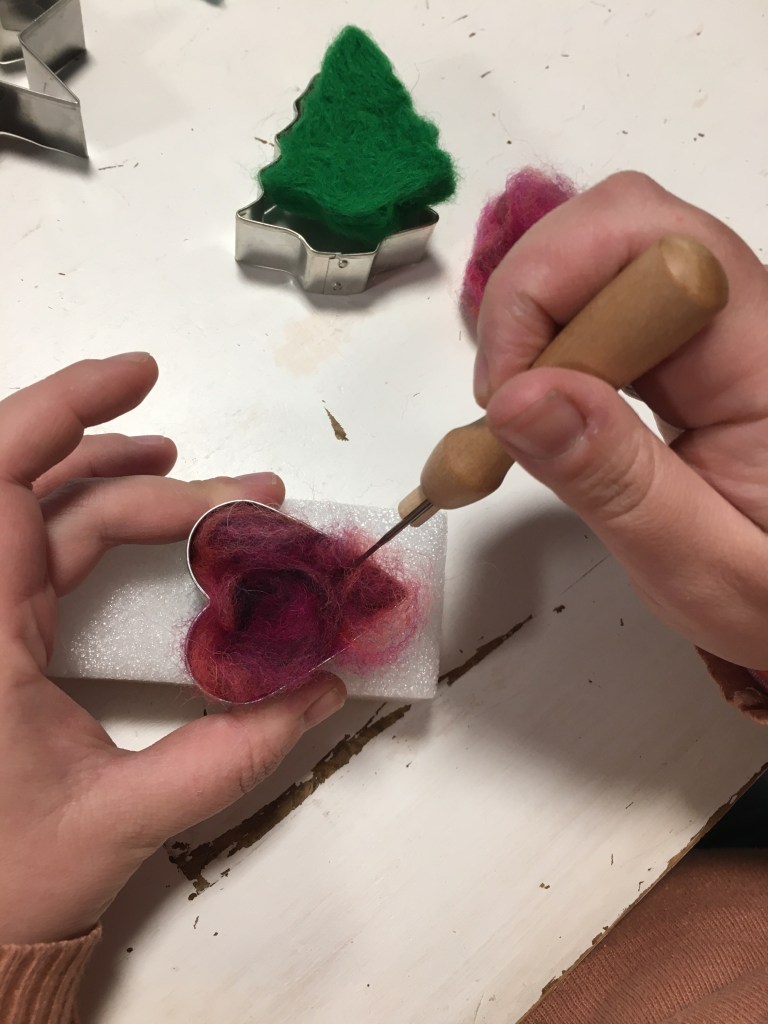
You will start as normal with gathering the roving wool. Do not use scissors to cut it as we want those raggedy edges to form the entanglement and therefore the felting effect.You will gently push the needle through the wool, not jab or stab. If you do stab you could break the needle tip on the metal. If you push down too far it will attache itself to the needle felting pad beneath. This is not ideal as we want to felt from both sides.Your fingers are protected because they are on the outside of the cookie cutter. You can turn the cookie cutter over and felt from behind, but you can also adjust the angle that you hold your needle at. Just bounce it in but at 45 degrees to make different bonds.
This will take around twenty minutes. You can hold it between finger and thumb to feel if it is thick enough.
If the cookie cutter is massive it will take longer. If you ant a more dense shape it will also take longer.
You can then tidy it up once it is out of the cookie cutter. Remember that you won’t be able to easily fit it back inside your shape though.
What next?
We will put the stars into a mobile for a gift, but the hearts will form part of a little valentines garland.
The best wool to use for needle felting is called roving. This is not a well organised and teased fleece, but a clean and carded wool that can be easily meshed together. The principles of the needle are that the barbs allow us to entangle the strands. Roving wool allows this to happen easily. The more messy the wool to start with the easier it becomes. It is not a science. However you can get started easily.
You want to be able to pull it apart gently and keep the fleece in line ready to manipulate.
Best wool for beginners needle felting projects
This wool is 100% Natural Wool Roving and perfect for making needle felting projects. It is from Corriedale cross sheep and you are also helping support an industry which has been established since 1955.
Perfect if you want an undyed roving wool, but for more vibrancy you could go for because with this kit you get 50 Colors Fibre Wool Yarn Roving . So you can be as creative as you like. It also gives you perfect freedom to play around.
Needle felting accessories
You will also need a good quality one of these! This one is also rather cute as it is made from natural wool.
These are fancy and it will save you time in the future that they are colour coded too! there are other brands available but these really will be a life saver in the future.
Needle Felting Projects For Beginners
We love to be creative and hope that everyone can find our Needle Felted Baubles nice and easy for your first project. We are using our new skills to work out the best rare breed sheep for our small holding. So that we can use all of our own produce.
You may also like to try
We love all of our craft project and you may also like to try..
Needle felted baubles are a fun way to create unique Christmas tree decorations. There is a comparatively small initial cost involved and it is easy to decide if you enjoy it before any big expenses. You can be completely creative and try any colour combination that you like.
For these needle felted baubles you will need
Felt Needle Tool Felting Starter Kit – this one includes finger guards. I didn’t need them but I am aware that as an electrician I am sort of used to a little pain in between the fun stuff. If you want a super cheap alternative try 40 colour pack of Merino Wool Tops for Needle/Wet Felting approx 120 gms I have chosen the multi pack as it is so full of colour and I think this gives the beginner the best chance of fun needle felted baubles.
If we were needle felting animals or statues we would need a mat to work on. Usual just a lap sized square of upholsters block. It is robust enough to take the occasional needle through it and fat enough to protect your lap! In this instance we have the bauble itself. Just don’t go too far into it!
Using a medium sized needle you can see that it is graduated to get wider, therefore the thing to remember is that the deeper you push the fatter the needle is. So if we want to create gentle joins with not much disturbance to the surface we go gently and don’t go too deep. If we want to make the wool more condensed we can stab it deeply.
Remember we cannot undo what we have done in needle felting but if we make it too compact, we can always add extra fleece to make it a larger size.
Getting started with your needle felted baubles
No scissors is the rule! You want the natural fibres to knot together and by cutting it you limit that ability. So gently pull the wool apart keeping your hands a good distance apart. It is possible to break the wool sideways as well. This gives us freedom to make small scraps useful.
YouTube Tutorial for Needle Felted Baubles
You can see from these images that I have twisted the wool together loosely. Then I hold firmly to the bauble. This then creates a surface to poke through. So bare in mind that the needle is barbed and the deeper you insert it the thicker the needle. This gives you freedom to mix it up a bit. Change the angle that you poke from and you will have a lovely firm connection.
Just work a small area at a time and keep moving around the bauble. You want it to be completely covered with no polystyrene showing. I like the swirls of this wool so I am keeping the direction of my wool. I also mix the colours as well. So once it is covered with my base wool I then add a top wool. Felting sideways as I go to keep them all together as one entangled piece.
We are 100% aware that these are not perfect, but they our beginners needle felting projects so are therefore perfect to us!
Other Handmade Christmas Decorations
What does needle felted mean?
The needles that you use for needle felting are barbed and designed to mesh the fibres together. The wool is naturally prone to entanglement so the needle just encourages that process. The more you work the wool the more dense it becomes. So you can make it more compact and rigid, but you can’t undo that process.
Can you felt without a felting needle?
No, because it is barbed and graduated to entangle the wool it wouldn’t work with smoother needles. Normal needles have the opposite design feature as they are intended to glide through without snagging. With the barbs your carded or loose wool becomes more dense and meshed together, making it ideal for modelling and shaping.
Is needle felting hard to learn?
If you want to get creative then it is an ideal beginners craft, but if you want to get some of those amazingly accurate animal sculptures then it is hard! So far I have made a few dozen needle felted baubles and it has massively helped my skills with the needle, but I am not in the same league as some of these super neat etsy stars! But give it a go, I have popped a few beginners kits together which are really affordable so you can try and not carry on afterwards.
How do I get started?
Start with a basic project. We have gone for baubles because I wanted some stocking fillers that were unique. If I am honest I think ours look better because they are not perfect, but very satisfying. We put a pack together that you can buy to get started. That way you will have everything you need with a smaller initial cost. We think that each bauble has cost us around £1. So not expensive but fun, so why wouldn’t you give it a go?
This is a cheats guide to making your own magnetic blackboard for your kitchen. Perfect for all sizes of kitchen! The cost will come in at under a tenner as well! Something to make everyone happy about! Low budget and wont take more than an evening or two to complete.
This is our secondhand fridge that we have hidden behind countless magnets and papers
You are going to paint directly to your fridge freezer. This is the scary bit. Ours was secondhand and really chipped and horrible. Like most people we covered it with magnets and paperwork. Mainly it was an effort to hide the very tired look of it. If you have just spent a few hundred on a new fridge freezer, you may not wish to use blackboard paint on it at all! The DIY blackboard paint project works as an upcycling project. It helped us to avoid taking the fridge freezer to landfill.
By not doing this is would have meant spending a lot more money on a new item for our kitchen! If you have already subscribed you will know about our No Spend Year and how we are looking to stop any new purchases. Perfect for a Zero Waste No Spend Kitchen Win!
A perfect gift for any baby shower, this cute wreath is easy to make and takes no real skill at all! This how to make guide is very easy and fun for all the family.
For the beginners guide of how to make a pom pom please follow the link.
Once you have made enough pom poms all you then need is a solid frame to build around, I found this one in a pound shop and this means I can then leave long ties for the pom poms and then create my own wreath. This DIY wreath is easy to adapt to any occasion, in this example it is for my baby niece, but I want to make one for Christmas as well.
You will be able to build the wreath as you go and it is not a difficult craft to master.
Heart shaped pom pom wreath, ideal for a baby shower.
Let me and everyone else on here know how you get on with it, why not give it a go over one cold winters evening?
I am looking forward to giving this as a gift, but who do you know that would love one of these?


 It is possible to break the wool sideways as well. This gives us freedom to make small scraps useful.

 You can see from these images that I have twisted the wool together loosely. Then I hold firmly to the bauble. This then creates a surface to poke through. So bare in mind that the needle is barbed and the deeper you insert it the thicker the needle. This gives you freedom to mix it up a bit. Change the angle that you poke from and you will have a lovely firm connection.
  I also mix the colours as well. So once it is covered with my base wool I then add a top wool. Felting sideways as I go to keep them all together as one entangled piece.


