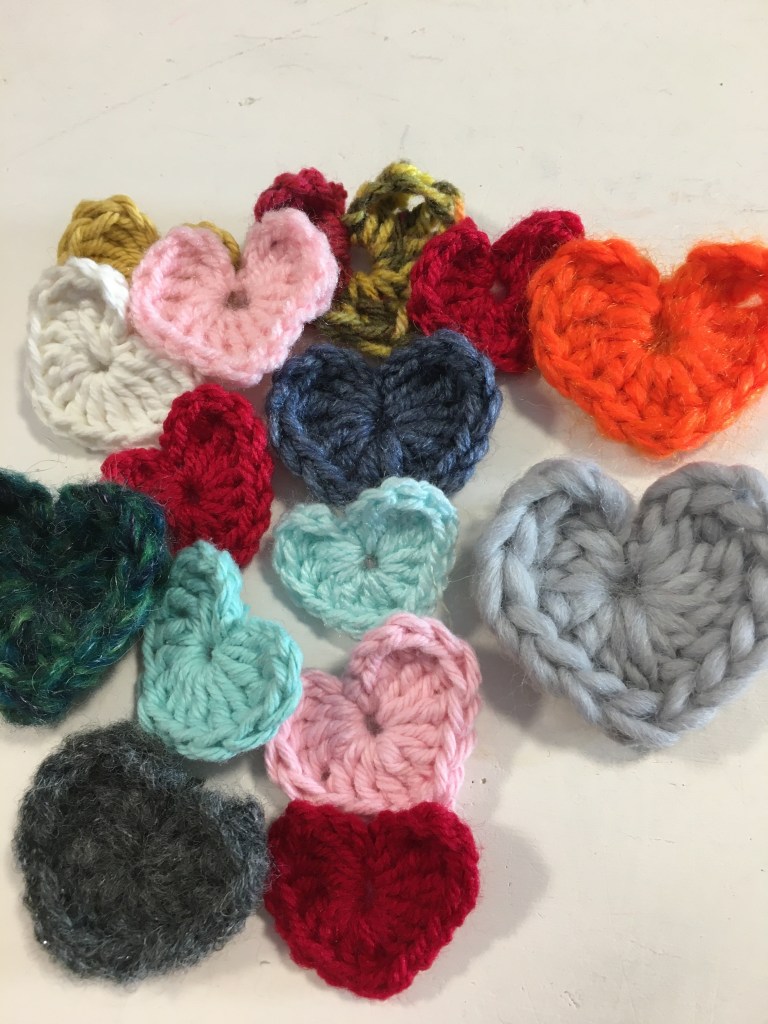
A crochet heart is a lovely addition to any gift set, whether it is for Valentine’s day or any token of love. We wanted to show you a simple pattern and offer you the chance to try crochet for yourself!
Bring the tail through to the front of your fingers, wrapping the wool from the ball around under and behind.
Then take the top wool across the original piece. Forming a crossover.Then using your crochet hook, pull the second thread of wool through, I twist here to help keep the tension.then chain three into the loop you have created.
Now to make the crochet heart
You will need to do three trebles into the magic circle. Ensure that you keep the tail to the left and that you incorporate it into the stitches.
Then you will crochet 3 doubles into the circle. Finishing with a treble at the point.
Now you work your way back up in reverse. 3 doubles, followed by 3 trebles. Then chain three and push your hoot through the centre of the tightened crochet heart and create a slip stitch.
Tie it to the back with a half reef knot, left over right and under. This way you will have a smooth peachy bump either side of the heart.
For me this is an ideal beginners project but you could try to Crochet Face Scrubbies for your next project, or even go a slightly higher level with Waffle Stitch Crochet as I love the effect.
We have lots of other ideas you may love including Peg Loom Rag Rug as a fun traditional way to use up scrap materials.
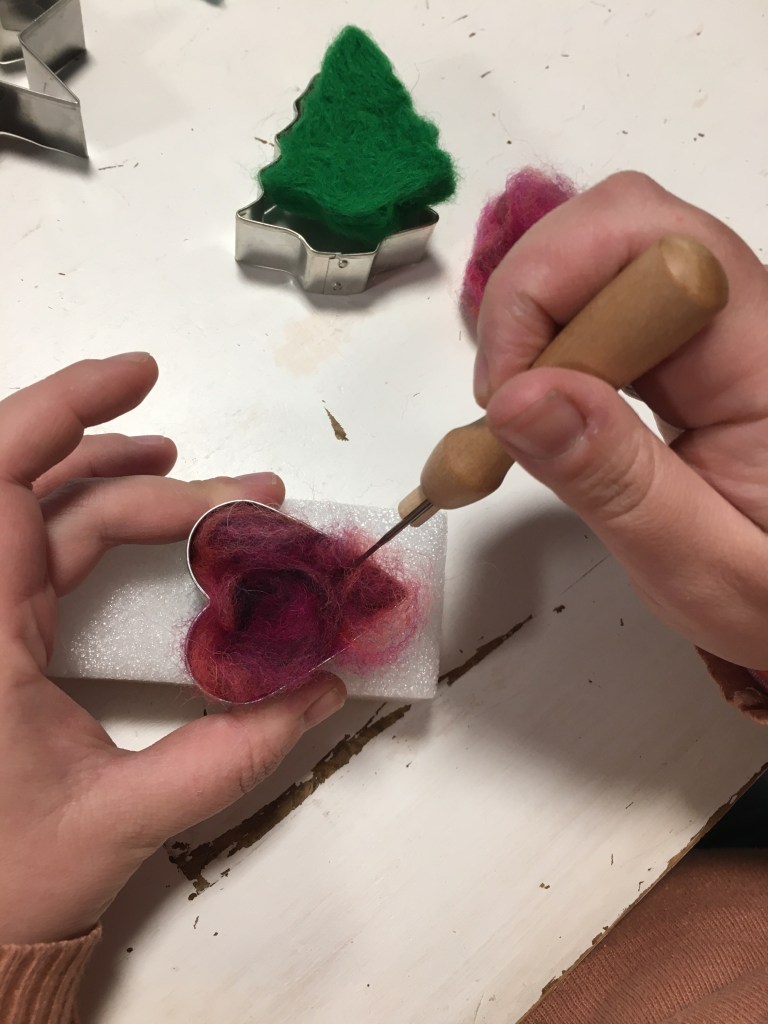
Needle felting with cutters is the ideal beginners project. You can create any shape without the need to be highly skilled whilst protecting your fingers from getting a little stabbed with the needle.
Needle Felting Supplies
you will need roving wool in any colour of your choice. Then you will need a set of needles, normal needles won’t do! If you want to learn more about the best wool for needle felting have a little look at our other articles.
Then take a look at some of the cookie cutters you already own, or try some here. We go for metal ones but just be aware that the end of your needle will be brittle and susceptible to damage if you hit the metal.
YouTube Tutorial
Using the Cookie Cutters
You will start as normal with gathering the roving wool. Do not use scissors to cut it as we want those raggedy edges to form the entanglement and therefore the felting effect.
You will gently push the needle through the wool, not jab or stab. If you do stab you could break the needle tip on the metal. If you push down too far it will attache itself to the needle felting pad beneath. This is not ideal as we want to felt from both sides.
Your fingers are protected because they are on the outside of the cookie cutter. You can turn the cookie cutter over and felt from behind, but you can also adjust the angle that you hold your needle at. Just bounce it in but at 45 degrees to make different bonds.
This will take around twenty minutes. You can hold it between finger and thumb to feel if it is thick enough.
If the cookie cutter is massive it will take longer. If you ant a more dense shape it will also take longer.
You can then tidy it up once it is out of the cookie cutter. Remember that you won’t be able to easily fit it back inside your shape though.
What next?
We will put the stars into a mobile for a gift, but the hearts will form part of a little valentines garland.
Waffle Stitch is one of those crochet stitches that look super effective and are actually relatively easy. I hope to show you an easy tutorial to make your own soft cotton face cloths.
You will need some cotton double knit. Now I love a variety pack and get them like this because you can make little matching sets for different family members. It is practical to make them different colours so that you have separate face cloths.
Get yourself a set of these
and you will be set for any project. For this one we will need a size 4 hook.
YouTube Tutorial for Waffle Stitch Face Cloth
How to start waffle stitch
You will be working a chain in threes. So for the face cloth we are thinking about 21 or 24 chains, on a 4mm hook. For a baby blanket around 60 will be good, don’t forget you will be using thicker wool so a 5mm hook will be great.
Once you have chained to a multiple of three you must add a further four chains on.
Then you will need to complete a treble into the second stitch from the hook. The treble is fully explained in the video but you want to wrap the hook before feeding it through and then bring one more back with you.
You will need to put a treble into the top of each of your chain stitches. When you get to the end of the first row you will chain one. Now for the waffle stitch part.
We turn it round and complete a treble back into the top of the first stitch Now we can decide which of the two row repeats we want to make. I go for a treble into the top of the first stitch, followed by a treble from behind the next stitch. So I will then do another one from behind. It is not pulling through any stitching but pulling the whole treble forward. This then creates the waffle stitch look. Two forward and one from on top.
When we get to the end we always give it one chain and then turn and treble into the top of the end stitch. Then we flip the pattern to keep pulling the waffle stitch pattern. Now instead of two trebles from behind we do one treble from behind and two from the top. Carry on until the end and then create our chain one and turn to repeat the second row again and so on.
Getting the pattern even
To finish it is really important that you do not give only half of the start, as you can see here it is not even. You can see that the top section is half as high as the bottom so make sure you give one more row. This is now more even.
Waffle Stitch blanket
I made this gorgeous blanket for my friend as a housewarming present and I couldn’t have enjoyed it more.
When you go for a blanket this big just do all of your chain stitches until it looks the right length. Then count them and work out if they divide into three. Then add your four more chains and start the treble back into it as above. I managed to do an entire ball of wool an evening but had to buy softer grip crochet hooks as a result!
Good luck and please do share with us if you have enjoyed making them!
Other Craft Projects you may like
The perfect accessory for a cosy night in front of the fire
The best wool to use for needle felting is called roving. This is not a well organised and teased fleece, but a clean and carded wool that can be easily meshed together. The principles of the needle are that the barbs allow us to entangle the strands. Roving wool allows this to happen easily. The more messy the wool to start with the easier it becomes. It is not a science. However you can get started easily.
You want to be able to pull it apart gently and keep the fleece in line ready to manipulate.
Best wool for beginners needle felting projects
This wool is 100% Natural Wool Roving and perfect for making needle felting projects. It is from Corriedale cross sheep and you are also helping support an industry which has been established since 1955.
Perfect if you want an undyed roving wool, but for more vibrancy you could go for because with this kit you get 50 Colors Fibre Wool Yarn Roving . So you can be as creative as you like. It also gives you perfect freedom to play around.
Needle felting accessories
You will also need a good quality one of these! This one is also rather cute as it is made from natural wool.
These are fancy and it will save you time in the future that they are colour coded too! there are other brands available but these really will be a life saver in the future.
Needle Felting Projects For Beginners
We love to be creative and hope that everyone can find our Needle Felted Baubles nice and easy for your first project. We are using our new skills to work out the best rare breed sheep for our small holding. So that we can use all of our own produce.
You may also like to try
We love all of our craft project and you may also like to try..
Hot chocolate stirrers make wonderful gifts for a class at Christmas, or as favours for a winter wedding! If we are honest they can get expensive if you are buying ready made ones! Even though they look sumptuous they are also often wrapped in single use plastics.
We used the Lakeland Silicone 20 Hole Mini Muffin & Cake Baking Mould as we wanted to keep them all together and push them out. The worry is you can have too much chocolate on each spoon and the drink becomes a bit yuck. The sides are rigid which really helps hold it all together.
Then you are also going to need some Wooden Teaspoons these ones are fully biodegradable and will go straight on the compost after use. All very in keeping with an Eco-Friendly Christmas or wedding, party any excuse really! The basis of hot chocolate stirrers are wooden spoons!
Making the Chocolate Stirrers
This is a good family activity and will be lovely as a gift for class mates at the end of year. However there is a lot of heat when we melt the chocolate, so depending on skill levels adults may be in charge of pouring.
To melt the chocolate we used a saucepan with a pyrex dish on it. The saucepan has water in it and the dish sits on top without touching the water at all. Break the chocolate down into small pieces. One bar of cooking chocolate will make around 4 spoons of very full chocolate. It has to be cooking chocolate as we want the stirrers to work in hot milk. The chocolate just needs to melt and not cook at all.
Keep stirring and when it has all melted take it from the heat. Then you can pour into the silicon cupcakes.
Watch our wonderfully awful video showing how easy it is to get the sticks to stand up! It is an epic fail but we did enjoy it and got them to stand tall eventually, but that is why we now use wooden spoons not sticks! Our epic fail is your triumph!
Now to make them unique…
Make your hot chocolate spoons unique!
The beauty of DIY hot chocolate stirrers is that you can load those spoons with all of their favourite things. Marshmallows, hundreds and thousands, lace it with alcohol anything you like.
If you are melting the chocolate over the hob it is the ideal time to add small amounts of alcohol at a time. This will not split the cooking chocolate and will depend on how you want it to turn out. We love Baileys in ours as it goes so well in hot chocolate.
If you are adding marshmallows use some patience! Wait until it is cooler. Then sprinkle on top. We use the mini marshmallows to hold the spoons in place as well!
Other Low Cost Ideas
The perfect accessory for a cosy night in front of the fire

 Bring the tail through to the front of your fingers, wrapping the wool from the ball around under and behind.


 The treble is fully explained in the video but you want to wrap the hook before feeding it through and then bring one more back with you.
 Now for the waffle stitch part.
 Now we can decide which of the two row repeats we want to make. I go for a treble into the top of the first stitch, followed by a treble from behind the next stitch.
 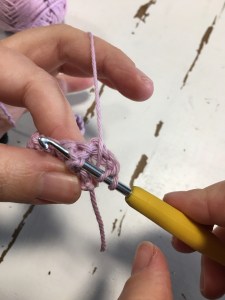 So I will then do another one from behind. It is not pulling through any stitching but pulling the whole treble forward. This then creates the waffle stitch look. Two forward and one from on top.
 Now instead of two trebles from behind we do one treble from behind and two from the top. Carry on until the end and then create our chain one and turn to repeat the second row again and so on.
 You can see that the top section is half as high as the bottom so make sure you give one more row.
  This is now more even.


